How to Build a Survival Shelter - Part 2
Family Emergency Kits - www.4ursurvival.com
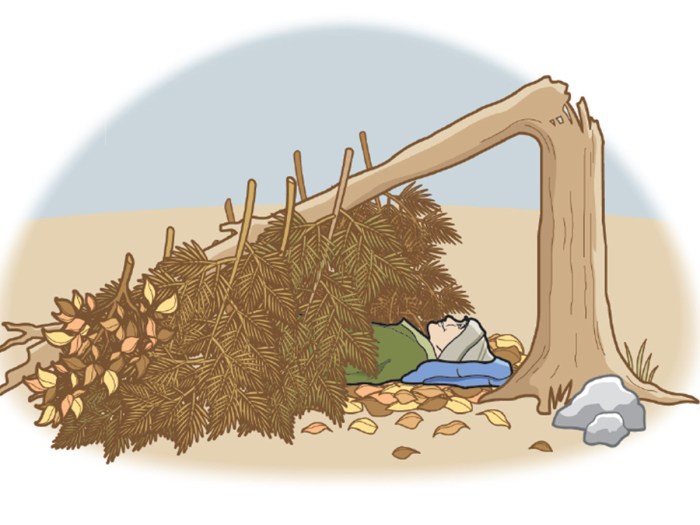
THE FALLEN TREE
The simplest shelter is a fallen tree that has enough room under it for you to crawl in. Lean branches against the windward side of the tree (so the wind is blowing into it and not against it) to make a wall. Make the wall thick enough to keep out wind. If you can build a fire on the open side of your shelter, the heat will help keep you warm.
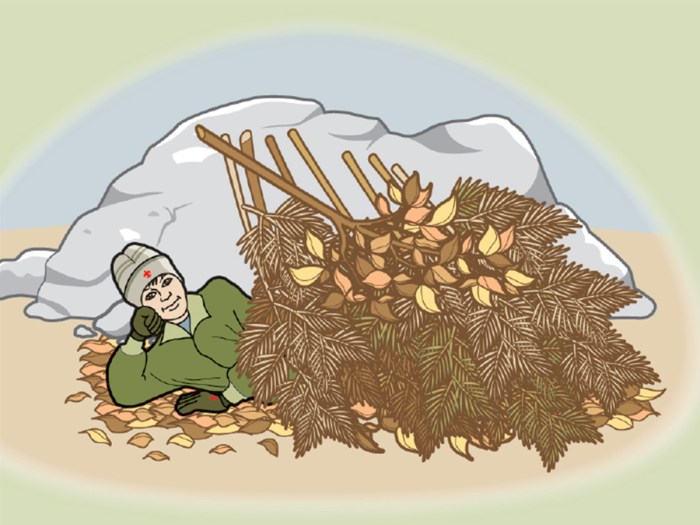
THE LEAN-TO
If you find a fallen tree without enough room under it, or a rock or a small overhang, you can build a simple lean-to. Start by leaning fallen limbs against the object, such as the top edge of an overhang, to create a wall. Lean the limbs at an angle to help shield rain. Cover the leaning limbs with leaves, boughs, pine needles, bark or whatever the forest offers. When you have built a thick wall, you can crawl underneath into your shelter. Remember to make your shelter no bigger than you need to fit you and anybody else with you. The bigger the space, the harder it is to keep warm.
You can also build a lean-to by placing one end of a long stick across a low limb of a tree and propping up the other end of the stick with two more sticks. Tie the ends of the sticks together with your boot laces or belt. Lean more sticks against the horizontal stick. Then pile leaves and other forest debris against the leaning sticks until you have a wall. Once again, a fire on the open side of the lean-to will add much heat to your “room.”
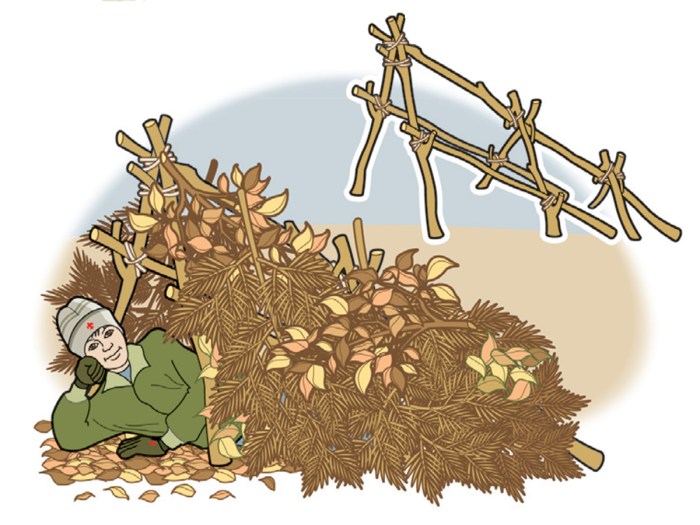
THE A-FRAME
If you can’t make a lean-to, you can make an A-frame shelter. You’ll need two sticks four or five feet long and one stick 10 to 12 feet long. Prop the two shorter sticks up in the shape of the letter A. Prop the longer stick up at the top of the A. Tie the three sticks together where they meet. The three sticks will be in the shape of an A-frame tent with one end collapsed against the ground. Now prop up more sticks against the longer stick, and pile forest debris against the sticks until you have an insulated shelter open at the high end.
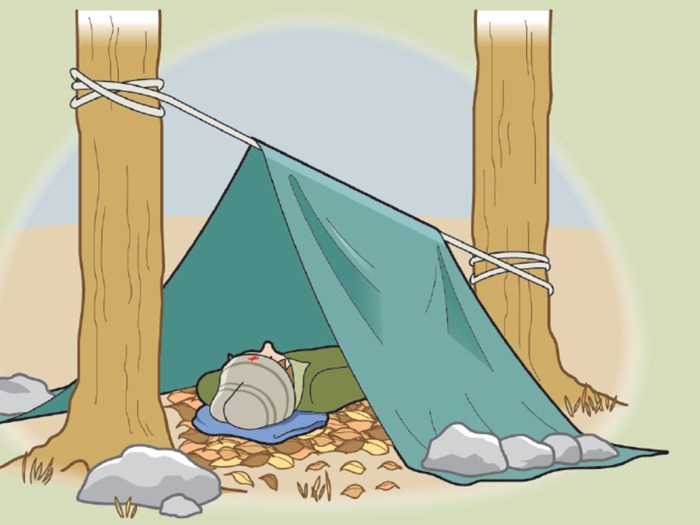
A TARP
When you have a tarp, sheet of plastic or Space Blanket with you, and some rope or cord, tie a line between two trees. Tie it low to the ground with just enough room for you to lie beneath. Stretch the tarp over the line. Place large rocks or logs on the ends of the tarp to hold it in place with the edges close to the ground. If it’s snowing, tie the line off higher on the trees. Steeper walls will shed snow better. Now you have an emergency tent.
YOUR BED
Your shelter is not complete until you have made a bed to lie in. Dry leaves work well. Make your bed a little bigger than the space your body covers and at least eight inches thick. When you snuggle into it, you are ready for the unexpected night out.
BAD PLACES TO BUILD A SHELTER
1. Anywhere the ground is damp.
2. On mountaintops and open ridges where you are exposed to cold wind.
3. In the bottom of narrow valleys where cold collects at night.
4. Ravines or washes where water runs when it rains.
Family Emergency Kits - www.4ursurvival.com
By Buck Tilton
Illustrations by Colin Hayes
Recent Posts
-
Hurricanes
Prepare for HurricanesKnow your Hurricane RiskHurricanes are not just a coastal problem. Find out ho …13th Sep 2021 -
Distress Signals
Distress Signals: What Distress Signals can you use?Help Flag - www.4ursurvival.comYou Will Need* A …30th Aug 2021 -
Get Ready for Disasters During National Preparedness Month
September is National Preparedness Month, the perfect time to get your household ready for an emerge …23rd Aug 2021

